13. Weapons
Half-Life is a shining example of having an already stellar gameplay elevated by well designed weapons, not just from a casual gamer’s point of view, but also that of a speedrunner. In this article, we will attempt to describe the physics of all the weapons in Half-Life that may be relevant to speedrunning. The physics of the various weapons are varied and interesting, with complexities ranging from those requiring only the simplest of descriptions to those demanding a level of research rivalling the player movement physics.
13.1. Bullet spread
The bullets of some weapons in Half-Life have a spread that cause them to deviate from the target slightly. The amount of deviation depends on the weapon. The deviation appears to be random and unpredictable to a casual player. However, bullets fired by the player rely only on the shared RNG, which we have concluded in Shared RNG that it is wholly predictable and non-random. In particular, if in a TAS the player loads from a savestate and fires a weapon with bullet spread in some fixed
The spread of the bullets when fired by the player is computed in CBaseEntity::FireBulletsPlayer. One of the arguments to this function is the number of bullets
This function uses the multidamage mechanism described in Damage system. At a higher level, the function begins by doing a clear on the currently accumulated damage and sets the accumulated damage type to DMG_BULLET | DMG_NEVERGIB. It then enters a loop that spreads and adds or accumulates the damage that will be inflicted due to each of the
The loop is the meat of the bullet spread physics. Let
Then, if
If this line trace hits nothing, then nothing important is done. If this line hits an entity, then the TraceAttack of the hit entity will be called with an amount of damage depending on the bullet type argument passed to this function. The TraceAttack typically performs the add multidamage operation. The reader is encouraged to read the SDK code for more details.
13.1.1. Actual bullet range
In (13.2), we observe that distance from the source to the end point is not
rather than just
13.1.2. Distribution
In (13.1), if we ignored the deeply flawed randomness of
However, due to the non-randomness of

Fig. 13.1. The square
We also observe that the spread of the bullets is square rather than circular. In other words, if
13.1.3. Meaning of 𝛀
The vector
#define VECTOR_CONE_6DEGREES Vector( 0.05234, 0.05234, 0.05234 )
Indeed,

Fig. 13.2. The different meaning of “bullet spread” used inconsistently in the SDK.
However, if we look more closely at (13.2), we see that the actual maximum angle of deviation is not exactly 6 degrees, for two reasons. Firstly, as explained in Distribution, the bullets spread in a square rather than a circle, so the angle of deviation from the centre is not constant. Even if we consider just the horizontal and the vertical angles of deviation, the actual angle differs from the intended angle because the method of obtaining the values defined in the SDK is incorrect given how those values are then used in (13.2). Specifically, (13.2) makes the maximum deviation to be the the line
In general, the actual angle of deviation
Admittedly, the difference is very small thanks to the small angle approximations
13.2. Quick weapon switching
When the player switches to any weapon in Half-Life, the weapon imposes a delay before any attack or reload is permitted. This delay may be called the switching delay, and is independent of the attack cycle time or delay between shots, except for the unique case of Gauss described in Gauss rapid fire. When the player switches to a weapon, CBasePlayer::SelectItem or CBasePlayerWeapon::SelectLastItem will be called. Both of these functions call the Deploy virtual method of the selected item. In all weapons of Half-Life, the CBasePlayerWeapon::DefaultDeploy is eventually called, whether or not the Deploy function is overridden by the weapon derived class. In CBasePlayerWeapon::DefaultDeploy, the switching delay is set to be half a second:
m_pPlayer->m_flNextAttack = UTIL_WeaponTimeBase() + 0.5;
This delay is enforced in CBasePlayer::ItemPostFrame:
#if defined( CLIENT_WEAPONS )
  if ( m_flNextAttack > 0 )
#else
  if ( gpGlobals->time < m_flNextAttack )
#endif
  {
    return;
  }

  ImpulseCommands();

  if (!m_pActiveItem)
  return;

  m_pActiveItem->ItemPostFrame( );
The CLIENT_WEAPONS is always defined in the compiler flags. Therefore, as long as the countdown is not up, m_pActiveItem->ItemPostFrame will not be called, which in turn prevents the reload and attack methods of the weapon being called.
The technique of quick weapon switching eliminates the switching delay completely. This technique is also known as “fastfire” in the community, which frequently creates confusion with gauss rapid fire (Gauss rapid fire) and thus must be avoided. To eliminate the switching delay, we simply perform a saveload immediately upon switching to a weapon. Examining CBaseMonster::m_SaveData in monsters.cpp, we do see CBaseMonster::m_flNextAttack being saved, which is inherited by the CBasePlayer derived class:
DEFINE_FIELD( CBaseMonster, m_flNextAttack, FIELD_TIME ),
When a game is loaded, the field is restored properly. However, in the overridden CBasePlayer::Restore, we see the following at the end of the method:
#if defined( CLIENT_WEAPONS )
  // HACK:  This variable is saved/restored in CBaseMonster as a time variable, but we're using it
  //        as just a counter.  Ideally, this needs its own variable that's saved as a plain float.
  //        Barring that, we clear it out here instead of using the incorrect restored time value.
  m_flNextAttack = UTIL_WeaponTimeBase();
#endif
Since CLIENT_WEAPONS is defined, UTIL_WeaponTimeBase simply returns 0. This effectively resets CBasePlayer::m_flNextAttack, bypassing the check in CBasePlayer::ItemPostFrame described above.
Note that picking up a weapon also incurs the same delay, though the mechanism by which this happens is slightly different: CBasePlayer::SwitchWeapon is called instead, which in turn also calls the Deploy virtual method of the new weapon. The subsequent logic follows the descriptions above.
A typical attempt at explaining the quick weapon switch, commonly seen even as of 2020, is to claim that the saveload eliminates the weapon switching animation. This explanation is incorrect, because the delay before being allowed to fire, or indeed any other weapon-related delays including attacks and reloads, are independent of the viewmodel animation. The delays are “invisible”.
13.3. Gauss
The gauss is one of the more interesting weapons in Half-Life. One of the earliest speedrunning tricks, the simple gauss boosting, and one of the most recently discovered tricks, quickgaussing, are both gauss-related. The gauss is arguably the most complex weapon in Half-Life, and it is worth devoting some paragraphs exploring its behaviour.
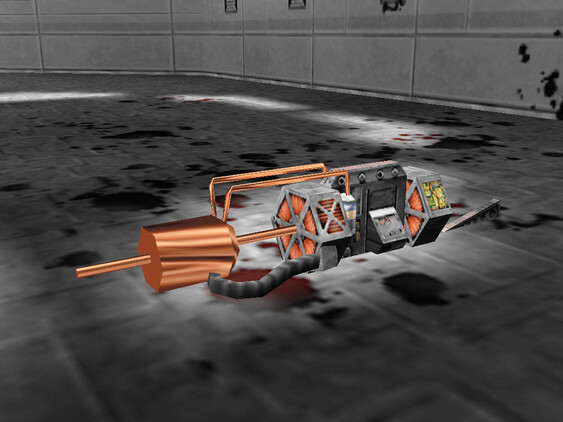
Fig. 13.3. The gauss weapon model.
The gauss weapon has two modes, as any entry level Half-Life player would know. The primary mode of the gauss fires orange beams consuming 2 cells and providing 20 damage. The delay between shots in primary mode is 0.2s. The secondary mode is more interesting. In single-player mode, the weapon consumes a cell every 0.3s while charging, starting from an initial consumption of one cell. The minimum charge time is 0.5s. If the weapon charges for more than 10 seconds, the weapon will discharge and inflict 50 damage onto the player. The damage of the beam in secondary mode otherwise scales linearly with charging time
Observe that the damage caps at 200 after charging for 4 seconds. The secondary fire produces a physical recoil, which is manifested by a change in the player velocity. If
where
The behaviour of gauss beams is relatively complex compared to other Half-Life projectiles. Intuitively, players recognise that gauss beams have a tendency to reflect off surfaces. Gauss beams can also “punch” through walls and damage entities at the opposite side, through a mechanism that is not obvious at first sight. Gauss beams can even inflict damage onto oneself under the right circumstances. What is more, the damage from gauss beams can be seemingly amplified when fired through particular geometries.
A detailed and complete understanding of the gauss behaviour can be achieved by reading the code in dlls/gauss.cpp in the Half-Life SDK. Rather than listing the code and tracing through line by line here, we shall explore the weapon by examples of its exploits.
13.3.1. Beam iterations

Fig. 13.4. Flow chart of
A gauss beam starts off with an initial damage nMaxHits with an initial value of 10. The game then perform at most 10 iterations (tracked by nMaxHits which is decremented each iteration) to to calculate the dynamic behaviour of the gauss beam. In each iteration, the game may reduce the damage, inflict damage to some entity, or calculate beam reflection. If nMaxHits reaches zero at some iteration
Crucially, the game also keeps track of the ignored entity, or pentIgnore in the code. This ignored entity is initialised to be the player entity before the iterations begin. The ignored entity is the entity that will be ignored by any line tracing, and can be changed from time to time as we will see shortly. What entity is or is not being ignored plays a huge role in some of the common exploits of this weapon.
In performing line traces, the game also keeps track of vecDir in the code. You can think of this vector as representing the direction of a the gauss beam in any iteration. This direction vector is initialised to be the player’s unit forward vector
Roughly speaking, in any iteration
Note
The game graphics will sometimes show a gauss beam seemingly reflecting off a non-gauss reflectable entity. This does not contradict what we described here: what you see is purely a client side visual artefact, and no reflection actually occurred on the server side. You can check this by placing an NPC in the path of the apparent reflected beam, and observe that the reflected beam does not damage the NPC.
Denote pentIgnore to be the hit entity. This causes the line trace in the next iteration to ignore this entity. The game now proceeds to the next iteration.
On the other hand, if the hit entity is GR, then the beam behaviour is more complex. The game first sets the ignored entity pentIgnore to null, which causes the subsequent line traces in this iteration to not ignore anything. Then, the game decides whether to reflect the beam. If
A gauss beam can reflect only if
Then the game will set
On the other hand, if the beam cannot reflect, which implies an angle of incidence of less than 60 degrees, then the subsequent beam behaviour is the most complex. The game first checks if the beam has reached this point in the previous iterations. If so, the iterations will simply stop. Otherwise, now that the beam has just reached this point in the code, that check will fail for subsequent iterations. In addition, if this gauss beam is fired from the primary mode, then the game will also stop the iterations.
The game traces a line from
If
13.3.2. Simple gauss boost
One of the simplest tricks for the gauss weapon is simple gauss boosting. Namely, speed boosting from the recoil of firing the secondary attack. The simple gauss boost remains one of the most versatile boosting methods in Half-Life, and is used to great effects in a typical Half-Life speedrun. Unfortunately, the gauss being an endgame weapon is manifested by the fact that its ammo supply is relatively constrained. Good ammo planning must be done to maximise the effectiveness of this weapon.
A common task in speedrunning is to get from one point to another in the shortest time possible using simple gauss boosting. From (13.3) we know that, assuming zero pitch, the horizontal speed boost is proportional to the charging time. On the other hand, the minimum charging time is 0.5 seconds. What is the optimal way to perform gauss boosts? Or, what is the boosting scheme for maximising the average speed (total distance travelled in a given time)? Should one repeatedly charge the gauss for 1s and firing, or repeatedly charge the gauss for 0.5s and firing? There is a simple way to answer this.

Fig. 13.5. Animation of horizontal speed against time with boosting schemes of different charging time
Suppose the player is stationary. At
If it is possible to pre-charge the gauss weapon before timing a particular run, then it is still beneficial to charge the weapon as much as possible and then release the charge at
13.3.3. Quickgauss
Quickgauss is a special kind of speed boosting similar to the simple gauss boost, except a save/load is done while the gauss is charging. When the charge is released after a game load, the result is similar to releasing a
Unfortunately, quickgauss only works in versions of Half-Life with the bunnyhop cap. This is because in these versions of Half-Life, in dlls/weapons.cpp the following lines define the states of the gauss weapon to be stored in the savestate:
TYPEDESCRIPTION CGauss::m_SaveData[] =
{
    DEFINE_FIELD( CGauss, m_fInAttack, FIELD_INTEGER ),
//  DEFINE_FIELD( CGauss, m_flStartCharge, FIELD_TIME ),
//  DEFINE_FIELD( CGauss, m_flPlayAftershock, FIELD_TIME ),
//  DEFINE_FIELD( CGauss, m_flNextAmmoBurn, FIELD_TIME ),
    DEFINE_FIELD( CGauss, m_fPrimaryFire, FIELD_BOOLEAN ),
};
IMPLEMENT_SAVERESTORE( CGauss, CBasePlayerWeapon );
Notice how the highlighted line is inexplicably commented out, so that m_flStartCharge does not get saved to the savestate. When the game is loaded from a save, this field will be zero. The calculation of current charging time is done by gpGlobals->time - m_pPlayer->m_flStartCharge throughout dlls/gauss.cpp, with gpGlobals->time being much larger than 4 in most cases. If m_flStartCharge is zero, the calculated charging time will be much larger than 4, and thus clamped to 4 and giving the maximum damage and recoil. On the other hand, the consumption of cells while charging is done periodically over a real passage of time, rather than calculated from the charging time. Since the real charging time is only half a second, only one cell is consumed in total.
It should be immediately apparent that quickgaussing is very powerful. If quickgauss is available in a particular version of Half-Life, the runner will almost never need to use the simple gauss boosting, as quickgauss is so ammo efficient. In the rare cases where it is desirable to perform a boost less than the maximum attainable, the runner can pitch up or down accordingly when firing to reduce the boost amount, according to (13.3).
13.3.4. Entity piercing
When a beam hits a non-gauss-reflectable entity, which implies it is damageable, the beam will first inflict damage onto the entity. Then, in the next iteration, the beam will ignore that entity while continue tracing forward. This results in the beam passing right through the entity untouched, and hitting some other entity instead. It is also important to note the beam does not lose energy when it passes through non-GR entities. Understanding entity piercing allows the runner to save time and ammo by reducing the number of shots required to damage multiple targets.
13.3.5. Doublegauss
Doublegauss refers to the technique in which a gauss beam hits a non-gauss-reflectable target entity, reflects off a gauss-reflectable entity beyond the first entity, and hits the target entity again with the reflected beam. As described in Beam iterations, a beam reflection is always accompanied by a radius damage created at the point of reflection. Using this technique, this radius damage is normally also inflicted onto the target entity. Typically, the target entity receives three damage inflictions overall. Though inconspicuous and seemingly unremarkable when executed in a speedrun, doublegauss is the secret to getting nearly double (with some caveats explained below) the damage out of a single shot for free, whether in primary or secondary mode.

Fig. 13.6. Aiming down at a crate and breaking it with one shot by shooting with the doublegauss mechanism. The crate was damaged three times, first by the incident beam, second by the radius damage on the ground below the crate, and third by the reflected beam. This technique very close to double the damage inflicted. This crate would otherwise have required two primary gauss shots to break, consuming four cells instead of two.
Let

Fig. 13.7. An illustration of the doublegauss technique.
Recall that if the angle of incidence is
At the end of the second iteration, the gauss beam will no longer ignore the target entity stuck in the first iteration. The reflected beam
Iteration |
Damage |
|---|---|
First |
|
Second |
|
Third |
The total damage inflicted onto the target non-GR entity is simply the sum of all damages, which has a maximum of
In the above analysis, we ignored what could happen next for the beam
Therefore, the total maximum potential damage inflicted by all of the
Of academic note, as each of
13.3.6. Entity punch
As explained in Beam iterations, a secondary gauss beam can punch through a GR entity if it does not meet the criterion for reflection. The damage produced by an entity punch is dependent on pentIgnore) and not able to detect certain entities, and therefore the line tracing may end at a further point, skipping these undetected entities along the way. And sometimes, if the thickness of an entity is too high, the game may wrongly determine that the trace is all solid.
Fig. 13.8. A secondary gauss beam can punch through a GR entity and create an explosion 8 units away from the exit point, with a damage magnitude proportional to
If the line tracings went well, the game will create an explosion 8 units away from the exit point. The thinner the walls or entities (barring the caveats above), the higher the explosive damage. Since the explosion origin is displaced from the exit surface, it is possible for the origin to be located inside some other entity, thus causes nuking (see Nuking and headshots). In general, entity punching can be very powerful. With a full gauss charge, the player can instantly create explosions of a maximum of 200 source damage, outclassing most explosive weapons.
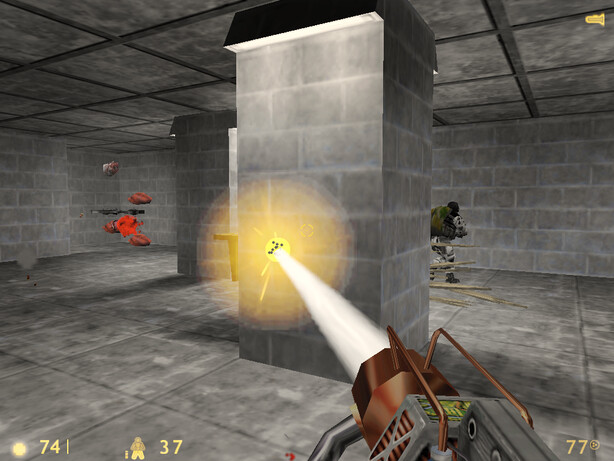
Fig. 13.9. An in-game execution of the gauss entity punch mechanism. While the beam struck the pillar and completely missed the human grunt targets, the explosion created on the other side of the pillar was able to reduce the grunt on the left into gibs and tear down a table on the right into splinters.
13.3.7. Reflection boost
Reflection boost refers to boosting which involves a reflection of the gauss beam. There are two variants of gauss reflect boost: ducking and standing. Reflection boosts can be used to provide vertical boost, which is not possible with a normal gauss boost in single player. The vertical boost is provided by means of self-inflicted damage, which can be costly to player health.
The ducking reflect boost sequence is as follows.
Start charging for quickgauss
Duck on the ground
Pitch to 30 degrees downward
Jump just before firing
Save/load for quickgauss
The beam should be reflected off the ground, at a 60 degrees angle of incidence. This provides the player a 866 ups horizontal boost and a respectable vertical boost. The sequence demands high precision to produce the desired effects.
The standing reflect boost uses explosive damage from beam reflection as well. However, the standing reflect boost sequence requires even higher precision to execute.
Start charging for quickgauss
Stand touching a wall
Pitch to 60 degrees downward
Yaw to look perpendicularly into the wall
Offset the yaw slightly to the left or right by about 1 to 2 degrees
Duck and jump simultaneously just before firing
Save/load for quickgauss
The result, however, is respectable.
13.3.8. Selfgauss
Selfgauss is a very well known trick, but probably one of the least understood among speedrunners. Selfgaussing is the result of the beam hitting the player as it is being fired out of the imaginary gun barrel, or specifically the player’s gun position. This is due to the origin of the line tracing
Caution
It is a common misconception that selfgauss occurs because the beam somehow “reflects” backwards onto the player after hitting a wall. It is easy to see that this is a wrong explanation, because the beam cannot reflect when the angle of incidence is less than 60 degrees, and the gauss beam cannot reverse its damage inflicting direction.
In the first iteration, the gauss beam will ignore the player, because pentIgnore is set the be the player entity, as explained in Beam iterations. Selfgauss will only work in the next iteration if pentIgnore is set to null, and
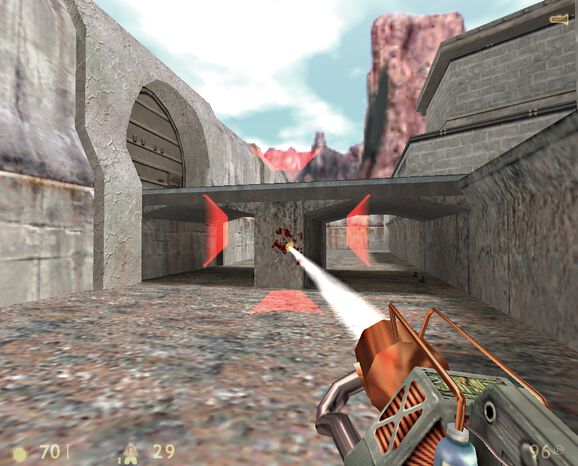
Fig. 13.10. A famous selfgauss spot in the boot_camp multiplayer map that has caused many players to die unintentionally.
Suppose when the player fires the gauss in secondary mode, the beam first strikes some entity at a sufficiently small angle of incidence so that the beam does not reflect. Assuming this entity is gauss reflectable, the game will perform two traces to determine the distance between the “exit point” and the entry point. This distance is denoted as
To perform selfgauss in practice, there are a few notes to keep in mind. Recall from Hitgroup that attacks that trace to the player’s head will deal three times the original damage. To save ammo, it is desirable to headshot the player while selfgaussing, giving a higher speed boost to ammo ratio. In addition, it is desirable to jump immediately before selfgaussing, as jumping provides an important initial vertical speed that can save health and ammo. However, note that a simple jump may not work. Recall from Duckjump that when the player jumps, the player model plays the jumping animation, which changes the model geometry (and thus the hitboxes’ positions) considerably. This can prevent headshotting even when the beam is fired from the same viewangles without jumping. The solution is to duck and jump, which prevents the jumping animation from playing.
13.3.9. Entity selfgauss
Entity selfgaussing is a way of doubling the damage of a secondary gauss attack using the same number of cells and charge time. Entity selfgaussing works very similarly to selfgauss (Selfgauss). The only difference is that, in the first beam iteration, the beam should hit the target entity which must be non-GR. As a result, the first damage will be inflicted and
13.3.10. Gauss rapid fire
When firing the gauss in the primary mode, there is a delay 0.2s between shots, similar to how other weapons behave. However, unlike other weapons in Half-Life, if a saveload is performed immediately after a primary fire, this firing delay will be eliminated entirely. Consequently, it is possible to fire the gauss at a dramatic rate, dishing out an extreme damage rate. For instance, each primary fire deals 20 damage. At 1000 fps, it is possible to fire the weapon at a rate of 1000 times per second, for a total of 50 shots (recall that each primary fire consumes 2 out of 100 cells). This results in an impressive 1000 damage in just 0.05 seconds. The downside, of course, is the dramatic ammo consumption. This technique is sometimes confusingly referred to as “fastfire” in the community, which must be avoided to prevent confusion with quick weapon switching (see Quick weapon switching).
The delay between primary fire in gauss is implemented by setting CBasePlayer::m_flNextAttack, which is unlike other weapons where CBasePlayerWeapon:::m_flNextPrimaryAttack is set instead. As described in Quick weapon switching, the value of CBasePlayer::m_flNextAttack is always reset after a restore, which eliminates the switching delay of all weapons and the cycle delay in gauss.
Gauss rapid fire is useful in situations where gibbing damageable entities as quick as possible is of utmost consideration, thanks to the primary fire’s ability to gib corpses. For example, clearing monsters in a narrow pathway which obstruct the runner’s path. The runner should always headshot monsters if possible to obtain a threefold damage increase. The weapon should be continuously fired even as the corpse is slowly falling after the monster is dead.
13.3.11. Reflection bypass
The reflection bypass refers to a method of causing the gauss beam to reflect and bypass a solid obstruction. Unlike the traditional way of punching through a wall using the secondary attack, this method relies on shooting very close to an edge so that the origin

Fig. 13.11. A gauss beam reflecting and bypassing a thin entity. The entity that lies within the dotted line of 8 units in length is skipped completely by the reflected beam.
This trick is useful for getting the beam to hit some entity on the other side of some thin obstruction with less than 8 units thickness. Although 8 units thin entities are relatively rare in Half-Life, it is not unusual to find them from time to time. The downside of this trick is that the beam loses some damage after reflection.
13.4. Hornet gun
The hornets created in primary fire has initial velocity
where
In both cases, the initial velocity is independent of the player velocity.
TODO
TODO
13.5. Gluon gun
The gluon gun, also known as the egon gun, is a powerful weapon when measured by the damage rate, especially in casual gameplay. Its damage rate is so high that it can obliterate almost every damageable entity in mere moments. It also does not require a particularly good aim or set up to use effectively. In speedrunning, however, weapon switching, the gauss (Gauss), and precise explosive placements almost always deliver better damage rate in short bursts.
The gluon gun only fires in the primary mode. It cannot be fired when the waterlevel is 3. Like the gauss, when fired it produces a sound of volume 450. When +attack is issued, the gluon gun initialises a damage countdown of 0.1s. If +attack is still active after 0.1s, the first damage will be inflicted onto whatever damageable entity is in aim. A line is traced from the player’s gun position to 2048 units in the direction of DMG_ENERGYBEAM | DMG_ALWAYSGIB is inflicted in the first and subsequent damages. This cycle continues until the attack is interrupted. If
Overall, the damage rate is 140 per second and the ammo consumption rate is 10 per second. When the attack stops, it takes 0.5s to restart it.
13.6. Tripmine
The tripmine is a high explosive that proved to be useful in speedrunning for damage boosting. As a weapon, it only admits the primary attack. The weapon first traces a line from the player’s gun position to 128 units ahead in the direction of the player’s unit forward vector FL_CONVEYOR flag set), then the weapon will create a monster_tripmine entity on the target surface. Specifically, if
The tripmine entity has very low health of 1, a unit forward vector MOVETYPE_FLY, which ignores gravity. Initially, it does not collide with any entity due to being a SOLID_NOT. This makes the tripmine impossible to be hit by any line trace and therefore any weapon, except for explosions. On spawn, it waits for 0.2s, then initiates the power up process. At a high level, this process involves the tripmine entity trying to find the entity it is attached to (hereinafter known as the host entity, the tripmine being the “parasite”) and making sure that entity does not change its origin position and the angles. In the beginning, it does not know the host entity. It tries to find it by tracing a line from
- hit its owner (usually the player) or started in solid
extends the process by another 0.1s
- hit an entity other than its owner
sets this entity as the host entity and remembers its origin and angles
- did not hit anything
remove the tripmine from the world after 0.1s
Assuming the tripmine found the host entity. In subsequent iterations, it tries to make sure the host entity has not moved or rotated since. If the host entity does move or rotate, then the tripmine will simulate “dropping” itself by creating a weapon_tripmine entity with the origin of SOLID_BBOX and the characteristic laser beam will be activated.
To activate the beam, the tripmine first traces a line from its origin
When the tripmine entity is killed, it initiates a delay before it actually explodes and inflicts a radius damage to the surrounding entities. This delay is randomised using the non-shared RNG (see Non-shared RNG) by picking a random number with
13.6.1. Skipping beams
As mentioned above, it is possible to skip the tripmine beam if the body moving across it has a sufficiently high speed. This is thanks to the beam meaning to check for entities obstructing its path only once every 0.1s. One way to decrease the actual checking frequency is by changing the frame rate to a very low value. If this is undesirable, then 0.1s is still a sufficiently large window to allow skips. Denote
is needed to skip a beam. For example, the player’s cross sectional width is approximately 20. Then a minimum speed of
In general, it may be tedious or impossible to predict the actual instances of time where the beam checks for entities. In particular, the
13.7. Hand grenade
The handgrenade is one of the most useful weapons for damage boosting in Half-Life. It is versatile and can be used in many situations. However, making a handgrenade land and explode at the right location can be tricky due to its bouncy nature and the delayed detonation.
The handgrenade experiences entity gravity MOVETYPE_BOUNCE. As a result, the
handgrenade experiences only half of the gravity experienced by the player. In
addition, recall from Collision that, if the entity friction is not 1,
then a MOVETYPE_BOUNCE entity has bounce coefficient
Interestingly, the initial speed and direction of the grenade when it is tossed
depend on the player pitch in a subtle way. For example, when
In general, we can describe the initial velocity and direction of handgrenades
in the following way. Assuming all angles are in degrees. First of all, the
player pitch will be clamped within
And if
To visualise this equation, we plotted Fig. 13.12. which depicts how the handgrenade’s relative horizontal speed and vertical velocities vary with player pitch.

Fig. 13.12. Plot of the relationship between relative horizontal and vertical velocities
by varying the player pitch
From Fig. 13.12., we can make a few observations to understand
the handgrenade throwing angles better. Firstly, player pitch within
13.8. Glock
The glock [2], also known as the 9mm handgun, is the first hitscan ranged weapon acquired by the player in Half-Life. It does not see much use in speedruns once more powerful alternatives are acquired, owing to its relatively slow firing rate and low damage. Nevertheless, it can be used in a combination of weapons for quick weapon switching, offering 8 damage of type DMG_BULLET. The volume of the gunfire is 600. Like most hitscan weapons in Half-Life, glock’s range is 8192 units from the player’s gun position. Reloading the glock takes 1.5s. Unlike the revolver (.357 Magnum revolver), the glock can be fired under water. It can also be fired in both primary and secondary mode. The main differences between them are the firing rate and the bullet spread.
Mode |
Cycle time |
Bullet spread |
|---|---|---|
Primary |
0.3s |
|
Secondary |
0.2s |
In primary mode, glock’s precision is only slightly worse than the revolver. In practice, since the damage of each shot in either mode is the same, the speedrunner should almost always fire in the secondary mode when a sustained fire is called for. The lack of precision can be compensated easily by knowing where the next shot would land and adjusting the player yaw and pitch.
13.9. MP5
The MP5 submachine gun is a fairly versatile weapon thanks to its secondary mode of firing contact grenades. The primary mode is also always fairly strong in the early game. Although it shares the ammo capacity with the glock (Glock), the damage of each bullet is 5 in the default game settings, lower than the glock’s damage. Nonetheless, the MP5 primary mode fires a shot every 0.1s, yielding a respectable damage rate of 50 per second, which is higher than glock’s 40 per second in the secondary mode. Unlike the glock’s secondary mode, the MP5’s primary mode fires at a higher precision, with a bullet spread of approximately
An MP5 grenade can be fired at a sound volume of 600. When touched, it explodes with a source damage of 100 in the default game settings. See Contact grenades for a description of its explosive physics. An MP5 grenade has an entity gravity multiplier of
where
It is possible to have two MP5 grenades touch each other and explode together.
13.10. .357 Magnum revolver
The .357 Magnum revolver or Colt Python is a very powerful hitscan weapon that fires high damaging rounds. With the default game settings, a single shot of the revolver deals 40 damage of type DMG_BULLET, which is greater than that of gauss in primary mode. The bullet range is 8192 units from the player’s gun position. Each shot creates a sound with volume 1000. The behaviour of the revolver is simple. In single-player mode, which is game mode we are most interested in, it only fires in primary mode. It cannot be fired when the waterlevel is 3. When the waterlevel is less than 3 and the clip is not empty, it fires once every 0.75 seconds. A reload takes 2 seconds. Contrary to what some believed, the revolver has a bullet spread of approximately
13.11. Crossbow
The crossbow is very powerful and important in speedrunning, thanks to its high damage. The crossbow has many downsides, however. It is not a hitscan weapon in single-player. When fired, a bolt entity is created with a low sound volume of 200, from a starting position of MOVETYPE_FLY, which makes it ignore gravity. The initial velocity of the crossbow bolt depends on the waterlevel at the time it is fired:
Fig. 13.13. With r_drawentities 4 we can see the model of the actual crossbow bolt entity that is created ex nihilo before the player when the crossbow is fired. In this screenshot, the bolt has already travelled for some distance.
When the bolt touches a damageable entity, it applies a damage of type DMG_BULLET and removes itself from the world. If the entity it touches is not damageable and is the worldspawn entity, it will embed itself at where the entity is struck for 10s as a SOLID_NOT.
Tip
This is a quick-and-dirty way of testing if an entity is the worldspawn: simply fire the crossbow at the entity and check if the bolt embeds itself on it.
Similar to the 357 revolver (.357 Magnum revolver), the crossbow fires at a rate of one bolt per 0.75 seconds. Still, it reloads at a glacial speed, taking 4.5 seconds to complete. Despite these downsides, the crossbow bolt does not have a spread and no known mechanism can cause its path to deviate.
13.12. Crowbar
The crowbar is
13.13. Shotgun
The shotgun is a very powerful hitscan weapon in Half-Life, and has seen much use in the early and middle game, and as a quick weapon switching combination in the late game. It can be fired in primary or secondary mode. Regardless of the mode, the shotgun fires a certain number of pellets in each shot. Each pellet deals a damage of 5 in the default game settings. The shotgun has a bullet spread of approximately
Mode |
Pellets |
Shells |
Cycle time |
Total damage |
|---|---|---|---|---|
Primary |
6 |
1 |
0.75s |
30 |
Secondary |
12 |
2 |
1.5s |
60 |
The shotgun has a more complex reloading behaviour. [3] Unlike other weapons, there is a delay after firing before the shotgun can be reloaded, and this delay is the cycle time corresponding to the last firing mode. For example, if the player fires the shotgun in secondary mode at time
Suppose the player initiates a reload after more than the cycle time since the last shot, either by issuing the +reload command or by emptying the clip. The CShotGun::Reload function will get called by CBasePlayerWeapon::ItemPostFrame, which kickstarts the reload process and starting a firing delay timer of one second. This causes the player to not be able to fire and cancel the reload until one second after the reload has begun. When this timer expires, the shotgun will initiate the actual loading of shells into the clip. This new state begins by starting another timer of half a second. Once this other timer expires, a shell will be added to the clip, and then the half-a-second timer restarts, and so on. This cycle is repeated at a rate of one shell every 0.5s, until either the clip is full or interrupted by firing the weapon.
13.13.1. Fast shotgun reload
The fast shotgun reload technique decreases the total shotgun reloading time by half a second. Observe that while the half-second timer is active and pending the loading of the next shell, the player can forcibly issue the +reload command again. Normally, issuing +reload while reloading other weapons has no effect. Those weapons call CBasePlayerWeapon::DefaultReload to reload, which sets the CBasePlayerWeapon::m_fInReload to true to indicate that reloading is in progress. If the player then issues a +reload command, a check in CBasePlayerWeapon::ItemPostFrame will prevent calling Reload again:
else if ( m_pPlayer->pev->button & IN_RELOAD && iMaxClip() != WEAPON_NOCLIP && !m_fInReload )
{
    // reload when reload is pressed, or if no buttons are down and weapon is empty.
    Reload();
}
The shotgun, however, does not call the CBasePlayerWeapon::DefaultReload and so CBasePlayerWeapon::m_fInReload remains false at all time. Every time the player issues +reload, CShotGun::Reload will be called. As illustrated in Fig. 13.14., if CShotGun::Reload is called while the half-second timer is still active, the shotgun will load the next shell prematurely, before the timer expires. In other words, in normal reloading (represented by the second graph) shells are loaded at the trailing edges of the half-second timers, but manually issuing +reload moves each loading of shell to the leading edge.

Fig. 13.14. An illustration of the fast shotgun reload technique, starting from a shell count of 5. The top two graphs represent the shell count in the clip over time, while the bottom represents the timers in the reload cycle. The blue one-second timer prevents interruption to the reload process by firing.
By issuing the +reload command at the points +reload again has no effect until the current timer expires.
13.14. Satchel charge
The satchel charge provides one of the highest explosive damages at the player’s disposal. As a weapon, it has both primary and secondary mode. The behaviour in each mode depends on the weapon’s state. If there is no thrown charges, issuing either +attack or +attack2 will throw a charge. Then, issuing +attack again will detonate the charge, while issuing +attack2 will throw another charge.
Throwing a satchel charge creates the entity at the player origin, rather than the gun position. The initial velocity of the satchel charge is set to be
where
A satchel charge has a source damage of 150 in the default game settings, which is higher than average. Refer to Detonating grenades for the explosive physics of the satchel charge. With regards to its movement physics, it is similar to the hand grenade (Hand grenade) in that it has an entity gravity of MOVETYPE_BOUNCE. This allows the satchel charge to experience half the gravity as experienced by the player, in addition to bounciness when colliding with other entities. One difference from the hand grenade is that the entity gravity is reset to 1 in the CSatchelCharge::SatchelSlide touch function upon touching another entity other than its owner. This makes a thrown satchel charge twice as heavy as soon as touching some entity such as a wall.
The satchel charge has a unique water physics. The satchel charge entity checks its waterlevel once every 0.1s in CSatchelCharge::SatchelThink. If the waterlevel is 3, the entity’s movetype is set to be MOVETYPE_FLY, making it ignore gravity. In addition, the new velocity is set to be
where MOVETYPE_BOUNCE. In any waterlevel other than 0 or 3, the velocity is modified as such:
The satchel charge also applies an additional geometric friction when it is close to the ground. Specifically, every 0.1s, it traces a line from the charge origin
The satchel charge has an owner property that remembers who created it. The satchel charge will pass through the owner, but collide with any other entity. The owner property is saved across save loads. It is also saved across map changes, provided the satchel charge does not disappear across transition. If it does disappear, the charge will lose the information about who the owner is, and so it cannot be detonated on primary attack and it will collide with the original owner.
13.15. Snarks
The snarks is a weapon which, when fired in primary attack, tosses snarks as monsters. The snarks is more useful in speedruns of the past, and has gradually been supplanted by more modern boosting and movement techniques aided by other weapons. Nevertheless, it still sees uses in certain situations as yet another tool available to the speedrunner for manipulating the difficult-to-control vertical movement. In primary attack, the weapon first traces a line from
where
where
The behaviour of the squeak grenade after release is described in Snarks.
Footnotes